This post may contain affiliate links. If you purchase something through any link, we may receive a small commission at no extra charge to you. Supplies used may be given to us free of charge, all projects and opinions are my own.
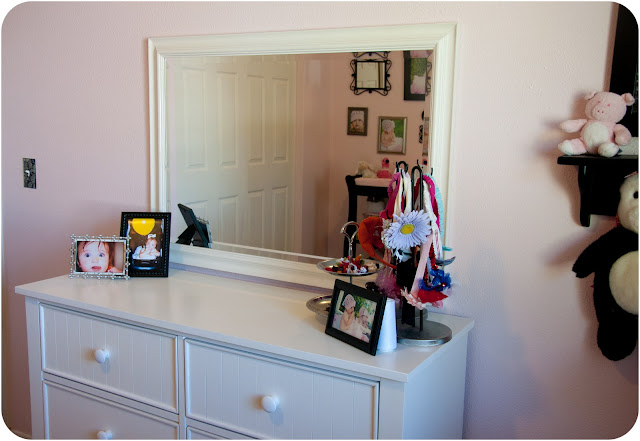
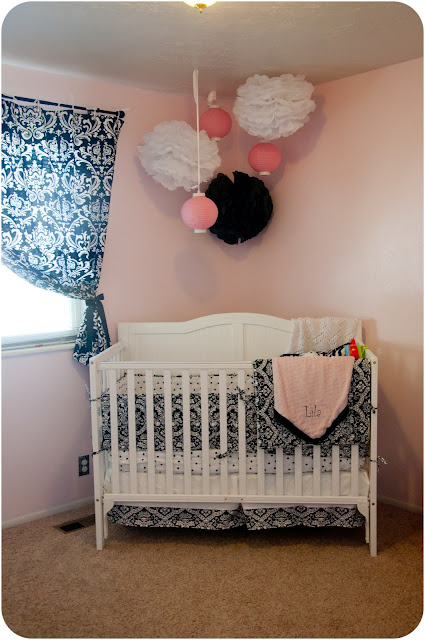
I promised when I revealed the nursery that I was going to share a couple of the DIY projects I did in there.
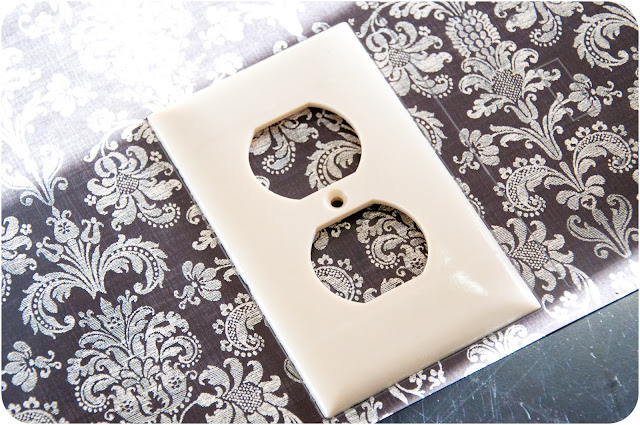
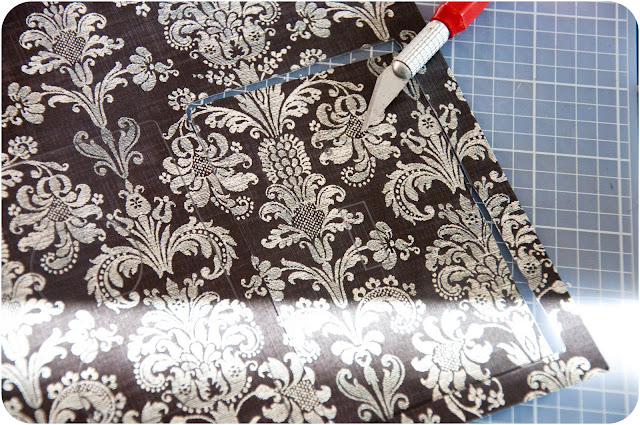
The first one I am going to share is pretty simple and probably self explanatory but I love the result so I want to share it anyway.
I saw one on pinterest that was darling but has since been removed. They were $3.50-$5.50 (excluding shipping) online and since I had everything I needed to make them at home I figured why not!
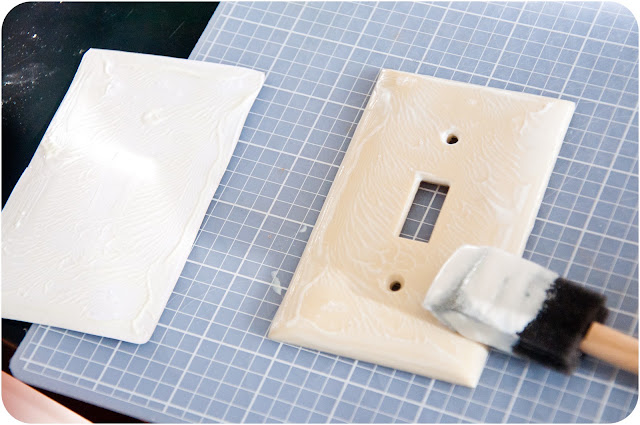
Items needed:
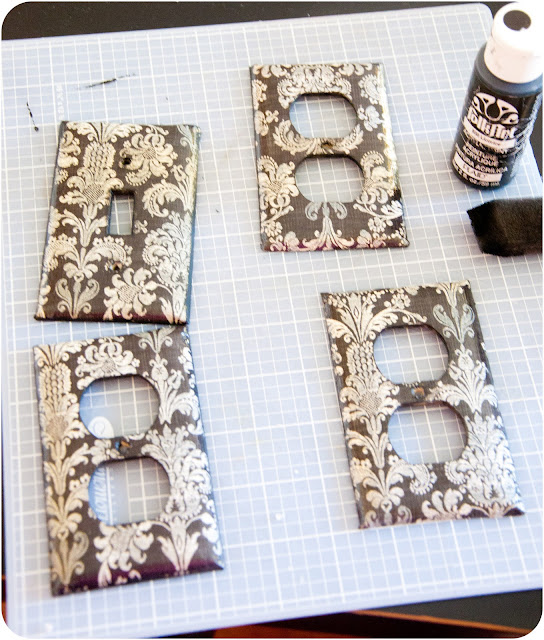
Light Switch Plates
Outlet Covers
Mod Podge
Xacto Knife
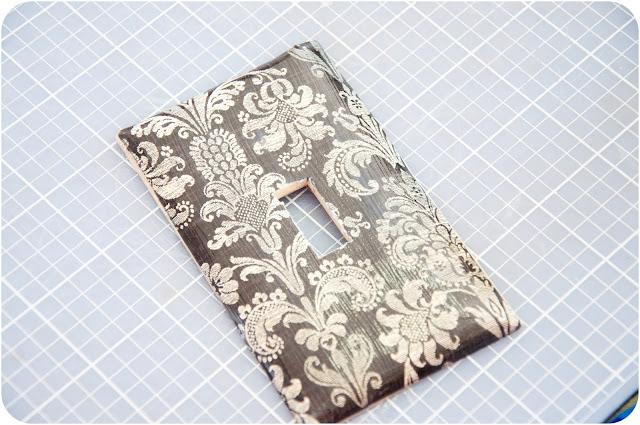
Scrapbook paper
Sponge Brush

Pink and Black Damask Nursery
Coat Closet Makeover Tutorial
Lakley Bedroom Makeover
- The Best Vinegar Paintbrush Cleaner Method - May 6, 2023
- 10 Fun and Easy St. Patrick’s Day Games - March 1, 2023
- Valentine’s Day Felt Wreath DIY - January 20, 2023


That is the neatest idea ever! I love it! I will have to do this to the outlets in my daugter’s rooms.
I agree with a lot of what you’re saying here but it could do with more detail. Thank you for sharing.
Adorable! I’d love it if you shared these at my #7 Link Party at Project Queen. I’m a new follower.
http://www.projectqueen.org
This is such a great idea! I really want to try this out! I am pinning this!
Thank you everyone. It was a really fun and simple project that I think had a lot of impact!
That is such a great idea! I shared this on FB http://www.facebook.com/pages/Momma-Hen/123880607653210
Did you use scrapbook paper or fabric? They look fabulous!
The million dollar question. What kind of paper did she use?
Well it couldn’t be fabric that she used, you cant cut fabric with the xacto knife.
Yes, you CAN cut fabric that’s been ModPodged with the XActo knife, once the ModPodge dries. 🙂
I did this 9 years ago in my dining room, but I used fabric. I used a spray adhesive and then used a clear shellac spray to protect them. Nine years later they still look like I made them yesterday!
Good tip about the shellac spray. I don’t care for Mod Podge because it always seems to leave brush marks unless it’s sanded a lot. .
I’ve heard that too. I haven’t noticed it too much because I usually use a sponge brush but can see that happening with an actual brush. Thanks for stopping by!
This is fantastic, Jenn! I’ve been wanting to replace my covers, but we have the other kind of switch and it’s hard to find “fun” covers for them… not to mention the cost! I think I need to buy stock in modge podge!
Thanks for sharing this MommaHen and thank you June, good luck!
Anonymous – I used scrapbook paper but I am sure you could use fabric just as easily!
Do you know how clever this is!
Featuring you ladies tomorrow… Feel free to stop by and button-up!
thank you Desiree!! That is awesome
these are so beautiful. i saw similar ones at a craft sale today and the lady was selling them for 10 bucks a piece! i was tempted to buy one for my nephew.
i have a question for you. where you post to several different link parties – is there a way to do that all in one shot rather than go to each individual party? it’s so tedious, going around to every.single.party site! email me [email protected]
These are really cute! I’m a new follower from http://www.littlee.org/blog. Would love a follow back.
Hi! Hopped over here from Not So Simple Housewife and I love this idea! What a simple way to pull your decor onto your walls. Thanks for sharing this project!
-Melissa, Walking in Faith
http://mnarbaugh.blogspot.com
I really love how these look. Do you think it can be done with fabric?
Not sure if anyone answered you but yes you can do it with fabric I use Aleens original tacky glue… I would do a thinner fabric tho if it starts getting too thick its a pain to get it on the wall without a small gap… Ive been doing this for many years and its so easy to change out if you change paint colors…
Hi Jenn – I wanted to let you know that I will be featuring your light switch covers at the #7 Linky Highlights Party tomorrow evening (Monday) at Project Queen. Thanks so much for linking up and I hope you do so again!
http://www.projectqueen.org
Fantastic, Jenn! I’ve been wanting to replace my covers, but we have the other kind of switch and it’s hard to find “fun” covers for them, I think I have to buy.
gorgeous, and adds so much! thanks so much for sharing on Craft Schooling Sunday!
i featured you!!!
http://typeadecorating.blogspot.com/2011/11/anything-goes-42-highlights-41.html
Looks great. I am definitely going to do this.
So charming~ Thanks so much for linking up at Feathered Nest Friday !
Oooh, I love that fabric. It turned out great!
is this a fire hazard?? i dont think so, but others are arguing with me!
Since I did not do anything to the back of the cover I cannot imagine how it could be a fire hazard. My husband also doesn’t know how it would be.
I’ve grown up decorating switch plates as a craft! I love this 🙂
Thanks Jessica, it was really fun and it really made a difference in her room 🙂
I did it! I finally did it. And I blogged about it. And I linked to your blog. I’m sure you’re thrilled. 🙂 Seriously, thank you for the idea.
http://www.dancingwithmysavior.com/2012/01/watch-out-shes-holding-glue-gun.html
Thank you for sharing Amy, I am totally trilled as you can see by my newest post!! Thank you thank you!
what a great idea!! thanks for sharing.
It is a fun one, thanks Kimberly!
Hello!
I featured your cute DIY on my blog yesterday 🙂
http://blog.shopdirtylaundry.com/posts/2012/1/17/99-too-cute-tuesday.html
ENJOY!
Cute! I just have one question. What is the paint for? I can see a bottle of paint in the photos and it mentions paint in the step before mod podge but I’m not sure what the paint is used for, other than covering up the white screws. Thanks!
Thank you Jeanee!
Kathleen, thanks for the question. In step 5 I say how I used a little bit of paint on the sponge brush and touched up all the edges inside the openings and around the outside. My paper didn’t fit exact and I knew I wanted the edges to be darker anyway so the paint was a good option for me. It isn’t necessarily needed but I like the way it looks. Thanks!
Love this idea. New follower from pinterest!
http://www.myhappilyeverafteragain.blogspot.com
I do this same idea with material… its so pretty… love your idea as well 🙂
I just made these tonight and they were easy to do and turned out great!!! Thanks for the idea =)
I LOVE to hear things like this Christy! Thanks for sharing, would love to see pictures!
any suggestions on how to keep the paper from not getting bubbles under it?
I didn’t get any bubbles but here are a couple ideas, start at 1 end and then use the back of a spoon to help get it all laid down without any bubbles, also you might try using a heavier paper? When I play around with it again I’ll see if there is anything specific I do, also maybe a little less mod podge?
may be a stupid question….I love this idea, would this be a fire hazard?
Not a stupid question, I believe someone else asked also. I don’t know how this would be a fire hazard, everything is on the outside of the switch plate so I don’t see how it would be any different than just putting a sticker on it.
I made one of these for my daughter’s room. Turned out better than I imagined. Thanks for the idea 🙂
Great idea! I really like the pattern you used as well
Thank you Kate.
Is this just simple scrapbook paper or is it something else? Its fantastic by the way!!
Yes, just simple scrapbook paper I picked up at hobby lobby. Thank you.
This is such a great idea! it adds something to a plain room. I love things that match and by doing this i can add a splach of color to any room!
Thank you Kayla. It is really fun and holding up great.
I haven’t tried this but I made realtree letters for my sons name for his room & baseball picture frame for his tball pictures. It was rather easy & turned out great! I didn’t think about plug & light switch covers…. I will for now, thanks
Isn’t it fun what you’re able to do with paper and mod podge?
I really loved the post so I used my Digg account to digg it.. It’s hard to find knowledgeable individuals on this matter, but you sound like you already know what you’re talking about! Thanks A rise in Amazing A lot more.
Did you cut the corners of the paper where the outlet cover curves, or does having the mod-podge on it make it flexible enough to stretch around the curving parts?
I think I know what you’re asking and no I didn’t have to cut anything the paper with the mod podge is very flexible.
I so can’t wait to do this and see how it turns out. This would be perfect for my girls room!! Thanks!
Fab Idea!!!!